Today's web applications need robust, not to mention consistent authentication methods to protect consumer data and help maintain a seamless user interface. As the latest safety threats hit each day, builders want to choose a method of authentication that is proven and less complex. Legacy authentication ideas that function as consumer-generated personal names and passwords for every software are both inefficient, but more importantly, compromised by protection holes.
This is where OAuth2 comes into the picture. The immensely popular oAuth2 authorization framework standardizes a scalable method for granting permission for consumer records through simple identity token assertions without revealing key credentials. However, integrating OAuth2 even with a popular vendor like Google can prove to be difficult if one is not familiar with the system or the latest Angular standalone components.
As we discussed earlier, Google already has a proven OAuth2 service, so how can you leverage the same to secure and make your Angular 18 application user-friendly? This blog post provides the solutions that challenge you by walking you through the steps to implement OAuth2 login with Google Cloud Client ID using Angular modern standalone components.
So, without wasting any time, let's get started and learn how you can do the same to your application by creating a secure, scalable & user-friendly authentication system.
Introduction
In the quick-evolving world of internet development, presenting a steady and individual-first-rate authentication mechanism is important. Integrating OAuth2 login with Google Cloud Client ID in an Angular 18 software is a well-known for its simplicity and safety. This guide will show you a way to put in force this integration using Angular standalone components, imparting you with a leaner and more modular codebase. By the quit, you may have a sturdy OAuth2 login setup to your Angular utility.
Why Use OAuth2 with Google?
OAuth2 is an open-preferred authorization protocol that provides a stable manner to provide websites or packages admission to consumer statistics without exposing passwords. Integrating OAuth2 with Google gives numerous blessings:
- Security: OAuth2 with Google prevents the need to keep sensitive records.
- Ease of Use: Users can use their current Google accounts for authentication.
- Scalability: Google's infrastructure can successfully cope with a huge number of users.
Prerequisites
Before diving into the implementation, make sure you have the following prerequisites in place:
- Basic knowledge of Angular components, services, and modules.
- Node.js and npm installed
- Angular CLI installed.
- A Google Cloud Platform account.
- Familiarity with OAuth2 basics.
- An existing Angular project or a new one created using ng new oauth.
Step-by-Step Guide to Setup OAuth2 Login in Angular with Standalone Components
Step 1: Google Cloud Setup
To use Google as an OAuth provider, follow these steps:
1. Create a Google Cloud Project:
- Go to the Google Cloud Console here.
- Create a new project.
2. Configure the OAuth Consent Screen:
Navigate to APIs & Services > OAuth consent screen.
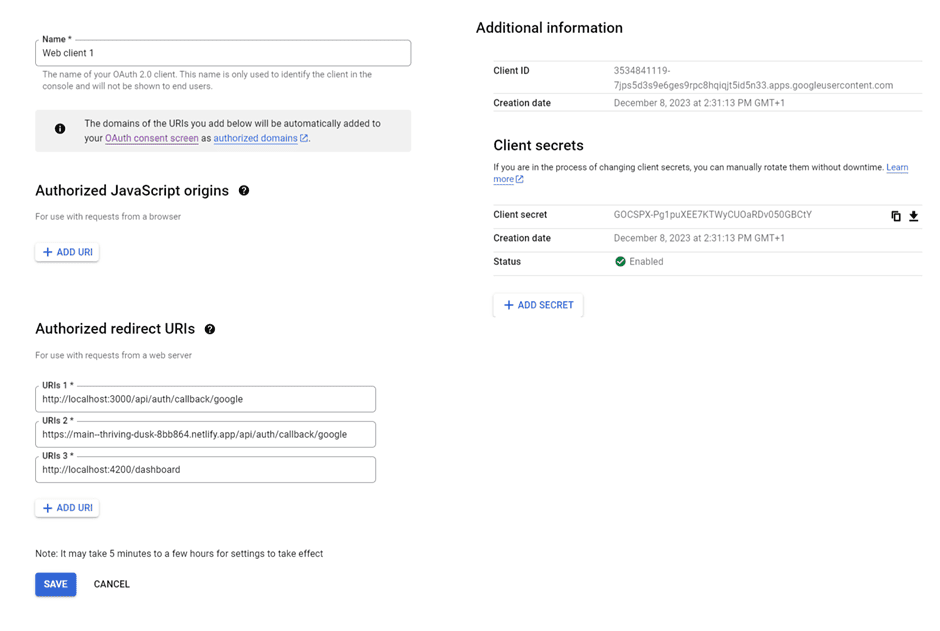
3. Create OAuth 2.0 Credentials:
Go to Credentials > Create Credentials > OAuth 2.0 Client IDs.
Choose Web application, and provide a name and redirect URIs.
Save the Client ID and Client Secret.
Step 2: Angular Project Setup
1. Install Necessary Packages:
Install the angular-oauth2-oidc library in your Angular project:
npm install angular-oauth2-oidc
2. Create authentication files:
Create auth-config.ts:
import { AuthConfig } from 'angular-oauth2-oidc';
export const authConfig: AuthConfig = {
issuer: 'https://accounts.google.com',
redirectUri: window.location.origin,
clientId: 'YOUR_GOOGLE_CLIENT_ID,
scope: 'openid profile email',
strictDiscoveryDocumentValidation: false,
};
Replace YOUR_GOOGLE_CLIENT_ID with your actual Google Client ID.
Create auth-google.service.ts:
import { Injectable, inject, signal } from '@angular/core';
import { Router } from '@angular/router';
import { AuthConfig, OAuthService } from 'angular-oauth2-oidc';
import { authConfig } from './auth.config';
@Injectable({
providedIn: 'root',
export class AuthGoogleService {
})
private oAuthService = inject(OAuthService);
private router = inject(Router);
profile = signal<any>(null);
constructor() {
this.initConfiguration();
}
initConfiguration() {
this.oAuthService.configure(authConfig);
this.oAuthService.setupAutomaticSilentRefresh();
this.oAuthService.loadDiscoveryDocumentAndTryLogin().then(() => {
if (this.oAuthService.hasValidIdToken()) {
this.profile.set(this.oAuthService.getIdentityClaims());
}
});
}
login() {
this.oAuthService.initImplicitFlow();
}
logout() {
this.oAuthService.revokeTokenAndLogout();
this.oAuthService.logOut();
this.profile.set(null);
}
getProfile() {
return this.profile();
} }
Step 3: Create Standalone Components
Create a standalone LoginComponent:
ng generate c login
Update login.component.html:
<div class="login-button">
<button mat-raised-button (click)="signInWithGoogle()">
<img src="https://cdn1.iconfinder.com/data/icons/google-s-logo/150/Google_Icons-09-512.png"
alt="Google"
class="google-icon"
/>
Sign in with Google
</button>
</div>
Update login.component.ts:
import { Component, inject } from '@angular/core';
import { FormsModule, ReactiveFormsModule } from '@angular/forms';
import { MatFormFieldModule } from '@angular/material/form-field';
import { MatButtonModule } from '@angular/material/button';
import { MatIconModule } from '@angular/material/icon';
import { AuthGoogleService } from '../services/auth-google.service';
const MODULES: any[] = [
MatButtonModule,
MatIconModule,
MatFormFieldModule,
FormsModule,
ReactiveFormsModule,
];
@Component({
selector: 'app-login',
standalone: true,
imports: [MODULES],
templateUrl: './login.component.html',
styleUrl: './login.component.scss',
})
export class LoginComponent {
private authService = inject(AuthGoogleService);
signInWithGoogle() {
this.authService.login();
}
}
Create a standalone DashboardComponent:
ng generate c dashboard
Update dashboard.component.html:
<div class="dashboard">
<h1>Dashboard - user has logged in</h1>
<p>
{{ profile() | json }}
</p>
<button (click)="logOut()">LogOut</button>
</div>
Update dashboard.component.ts:
import { CommonModule } from '@angular/common';
import { Component, inject } from '@angular/core';
import { Router } from '@angular/router';
import { AuthGoogleService } from '../services/auth-google.service';
const MODULES = [CommonModule];
@Component({
selector: 'app-dashboard',
standalone: true,
imports: [MODULES],
templateUrl: './dashboard.component.html',
styleUrls: ['./dashboard.component.scss'],
})
export class DashboardComponent {
private authService = inject(AuthGoogleService);
private router = inject(Router);
profile = this.authService.profile;
logOut() {
this.authService.logout();
this.router.navigate(['/login']);
}
}
Step 4: Provide OAuthService in the App
Update app.config.ts
import { ApplicationConfig, provideZoneChangeDetection } from '@angular/core';
import { provideRouter } from '@angular/router';
import { routes } from './app.routes';
import { provideHttpClient } from '@angular/common/http';
import { provideAnimationsAsync } from '@angular/platform-browser/animations/async';
import { provideOAuthClient } from 'angular-oauth2-oidc';
export const appConfig: ApplicationConfig = {
providers: [
provideZoneChangeDetection({ eventCoalescing: true }),
provideRouter(routes),
provideHttpClient(),
provideOAuthClient(),
provideAnimationsAsync(),
],
};
Update main.ts:
import { bootstrapApplication } from '@angular/platform-browser';
import { appConfig } from './app/app.config';
import { AppComponent } from './app/app.component';
bootstrapApplication(AppComponent, appConfig)
.catch((err) => console.error(err));
Source code: https://github.com/davidivanovic22/oauth2
Conclusion
Applying OAuth2 with Google Cloud Client ID into the Angular 18 software utilizing standalone components provides a great and admirable solution for contemporary internet programs. Since Angular practical components are utilized, it has been possible to develop an even more modular and easy-to-maintain structure since functions can be developed instead of trying to deal with very complicated authentication mechanisms imposed by various systems. This paradigm not only makes the merge technique more efficient, but also future-proofs the architecture allowing for easier extensions.
Google’s integration of OAuth2 comes with several benefits – enhanced security, use of fewer steps in the customer experience, and extending the business to serve many clients without challenges. It eliminates the risk of handling sensitive client information that keeps customer credentials; a task that can be left to a reliable service such as Google. In such a scenario, trust that your application implements an easy yet effective and secure way to authenticate the users of the application.
In case you find this article useful, don’t forget to consider it for your applications where you will implement OAuth2 and try to find the new writing idiom approaches to keep your projects successful and greener. Next, look for more advanced tutorials on Angular, authentication, and other new approaches to web development.
Reference
https://angular.dev
https://www.npmjs.com/package/angular-oauth2-oidc